

Infographic Maker AI Documentation
Everything you need to know about using Infographic Maker AI — from signing up to creating stunning visuals. Can't find what you're looking for? Contact our team.
Sign Up Process
To create an account on Infographic Maker AI, follow these simple steps:
A Visit the Registration Page
B Choose Your Preferred Sign-Up Method
We offer two convenient ways to register:
- Standard Registration — Enter your name, email address, password, and confirm password to create an account manually.
- Google Sign-Up — Quickly sign up using your Google account — no need to remember another password.
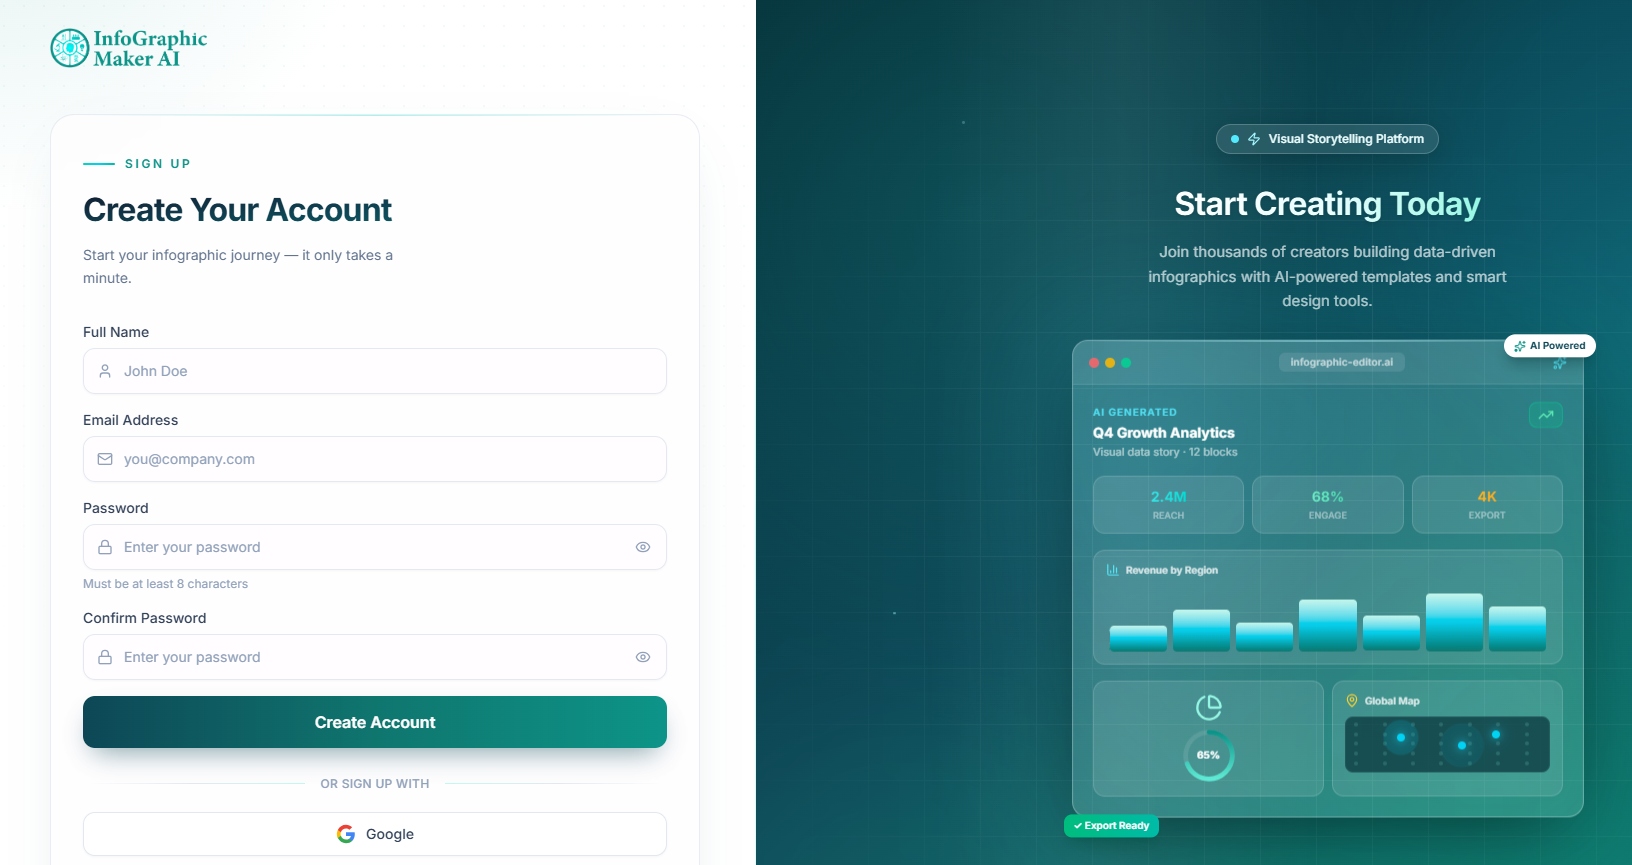
C Enter Your Details
- First & Last Name — Used for your account profile.
- Email Address — This will be your login ID.
- Password — Enter any password you want to use for your InfoGraphic Maker AI account.
Verify Your Email
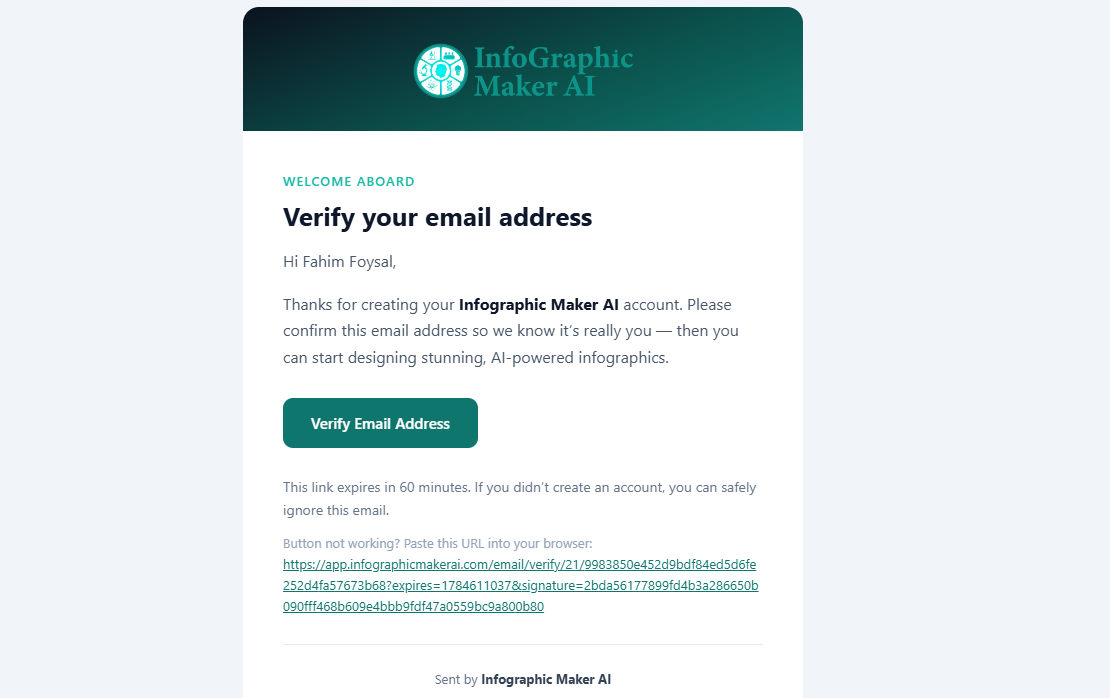
After signing up, an automatic verification email will be sent to the address you provided. Check your inbox — look for an email from InfoGraphic Maker AI.
Tip: If you don't see it, please check your Spam or Junk folder.
Open the email and click the Verify Email Address button. Once verified, your account will be fully activated and ready to use.
Getting Started: Your Dashboard (Home)
When you log in, the Home tab is your workspace overview. Here you'll find:
Welcome Banner
A quick snapshot of your account activity.
Total Projects
The number of projects you've created.
AI Creations
How many AI-generated assets you've produced.
Templates Used
The number of templates you've applied to a project.
Create with AI
A shortcut button that jumps straight into the AI generator.
New AI Infographic / Browse Templates
Quick links to start a new project either from scratch with AI or from an existing template.

Credit Usage
Below the quick stats, the Credit Usage panel tracks:
- Remaining — credits left on your plan.
- Used — credits spent so far.
- Total Actions — the number of generation actions you've performed.
A table below lists each action's date, action type, description, credits used, and your balance afterward, so you always know where your credits are going. Click View pricing plans if you'd like to upgrade for more credits.
InfoGraph AI
The InfoGraph AI tab is the AI Studio — your main hub for generating visuals from a text prompt.
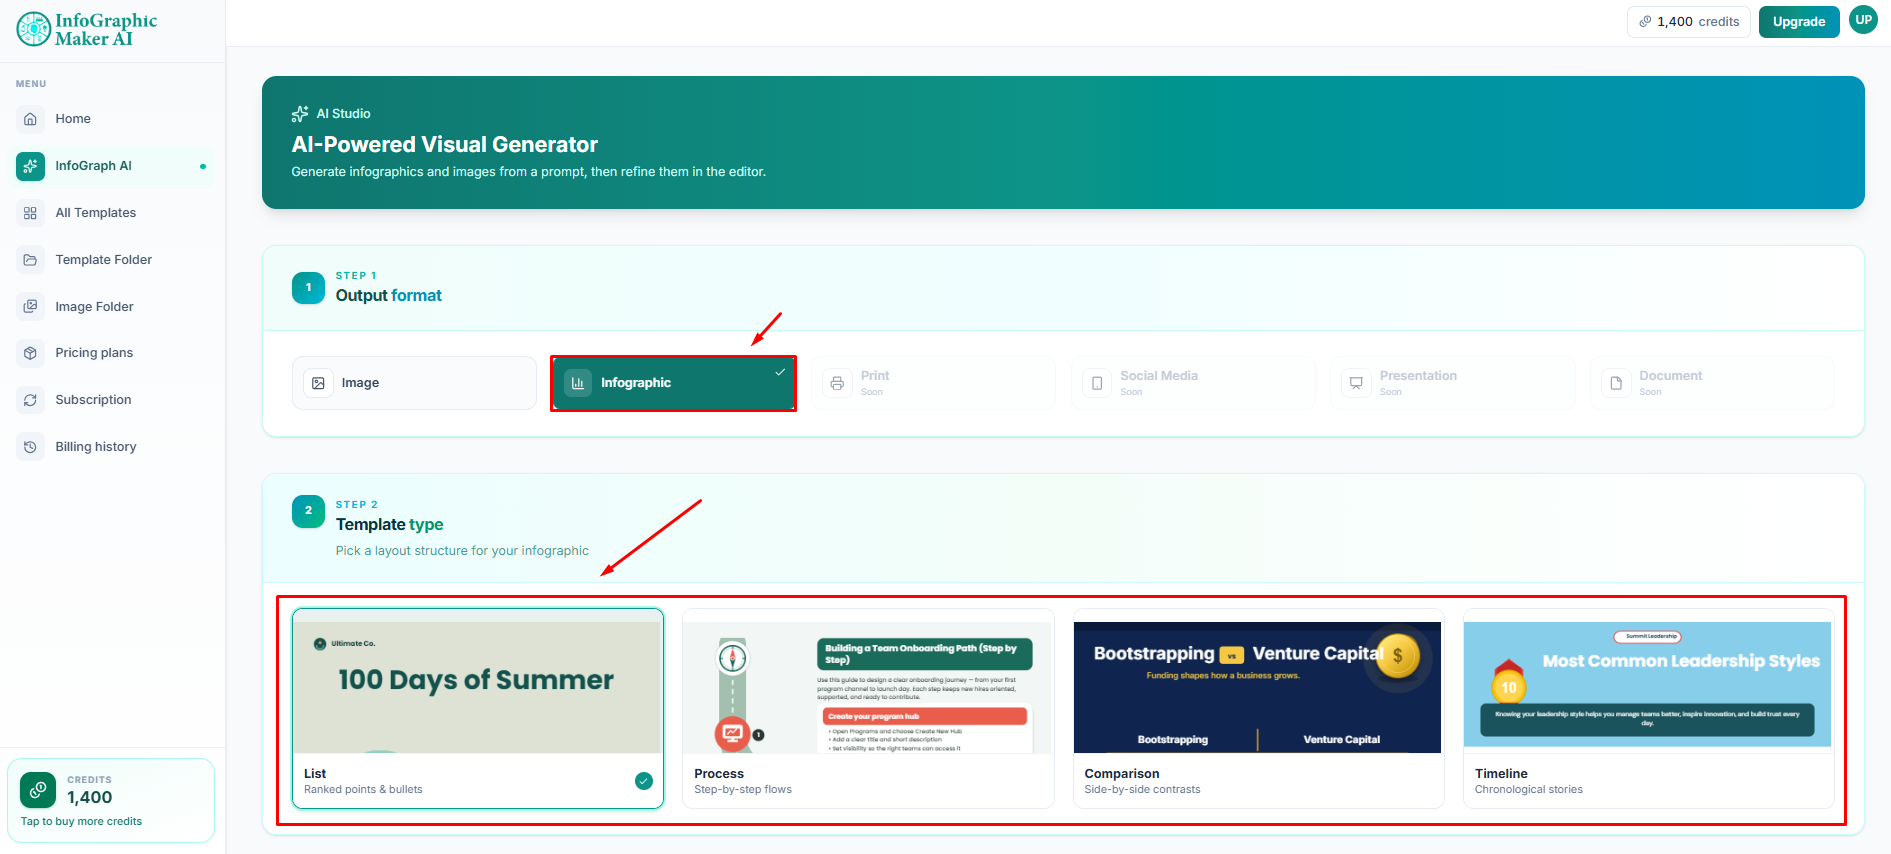
Step 1: Choose Your Output Format
At the top of the AI Studio, select what you want to create:
- Image — a single AI-generated image.
- Infographic — a structured, data-driven visual.

Step 2: Choose a Tool
Once you select Image as your output format, pick a specific tool:
- Image Generator — create an image from a text description.
- Icon Generator — generate custom icons.
- Logo Generator — generate logo concepts.

Using the Image Tool
Selecting the Image Generator opens the Image Tool, "Turn Words into Pictures in seconds." Here's how to use it:
1 Tell us what to create
Type a description of the image you want (e.g., "Teacher explaining a concept to students"). Click Inspire Me if you need prompt ideas.
2 Auto Enhance Prompt
Toggle this on to let the AI refine your prompt automatically before generating.
3 AI Model
Choose which AI model powers your generation (e.g., GPT Image – Vivid).
4 Output Size / Ratio
Select your desired image dimensions (e.g., 1:1 Square — 1024 × 1024 px).
Quick Start: Try example prompts — quick-start suggestions are listed below the prompt box if you want inspiration.
Click Generate AI Image to create your image. The credit cost for the action is shown directly on the button.
Creating an Infographic
Selecting Infographic as your output format opens a two-step flow:
1 Output Format
Confirm Infographic is selected.
2 Template Type
Pick a layout structure that fits your content:
- List — ranked points and bullets.
- Process — step-by-step flows.
- Comparison — side-by-side contrasts.
- Timeline — chronological stories.
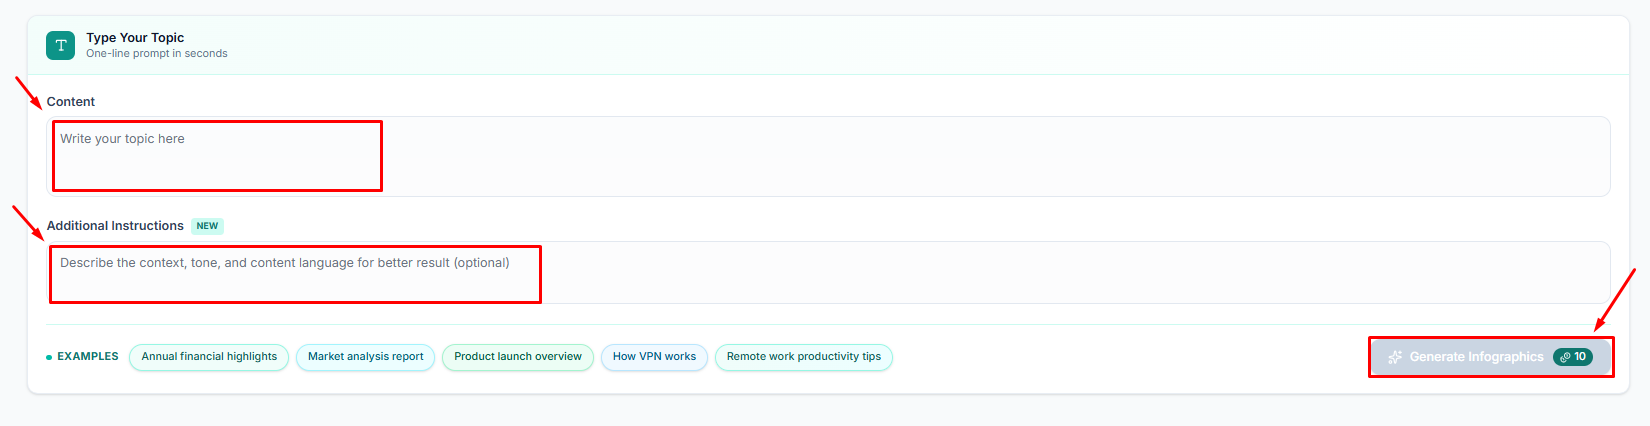
3 Type Your Topic
- Content — enter your topic in the text field (e.g., "Annual financial highlights," "Market analysis report").
- Additional Instructions (optional) — describe context, tone, and content language for a more tailored result.
- Examples — click a suggested topic to auto-fill the content field if you're not sure where to start.
Click Generate Infographics to produce your visual. The credit cost is displayed on the button.
Choosing an Infographic Template
After generating — or instead of generating from scratch — you can pick a Suggested Template. The AI fills the text into the layout while keeping the design and style intact. Templates include a range of ready-made styles such as comparison charts, statistics highlights, roadmaps, and timelines. Simply click a template to apply it to your content.

All Templates
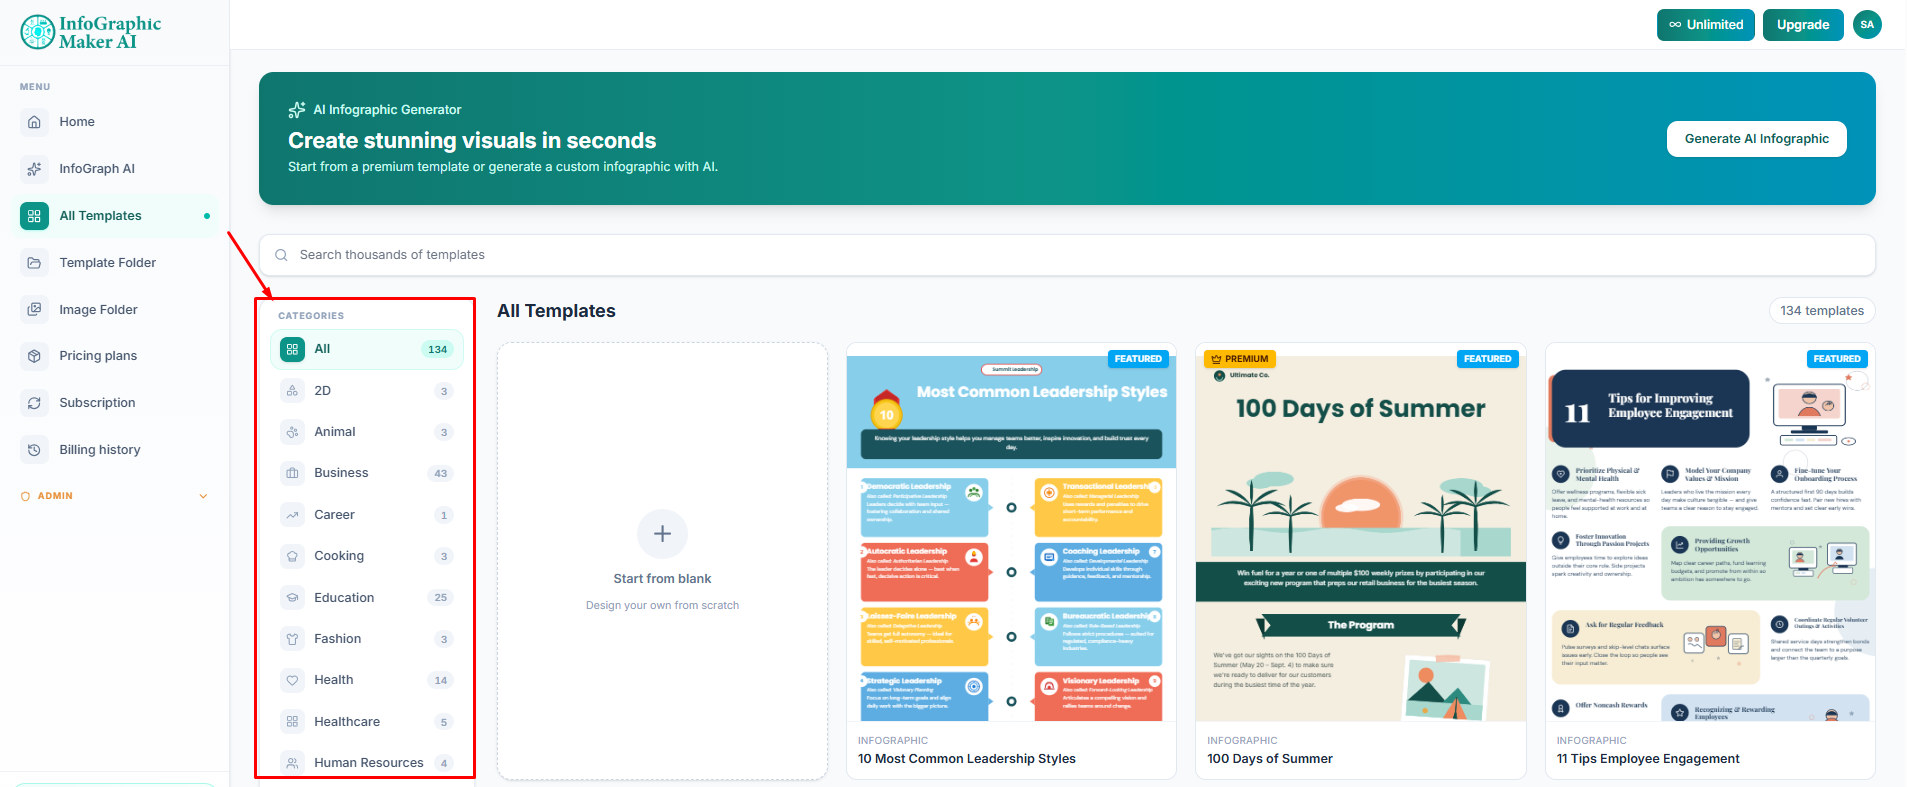
The All Templates tab is your complete template library — the fastest way to start a project when you don't want to begin from a blank canvas or write a prompt from scratch. At the time of writing, the library includes 134 templates, and new designs are added regularly, so it's worth checking back if you don't find exactly what you need on your first visit.
Finding the Right Template
S Search
Use the search bar at the top of the page to look up templates by keyword. Searching for terms like "timeline," "health," or "business" will surface every matching template regardless of category, making this the quickest route if you already know what you're looking for.
C Filter by Category
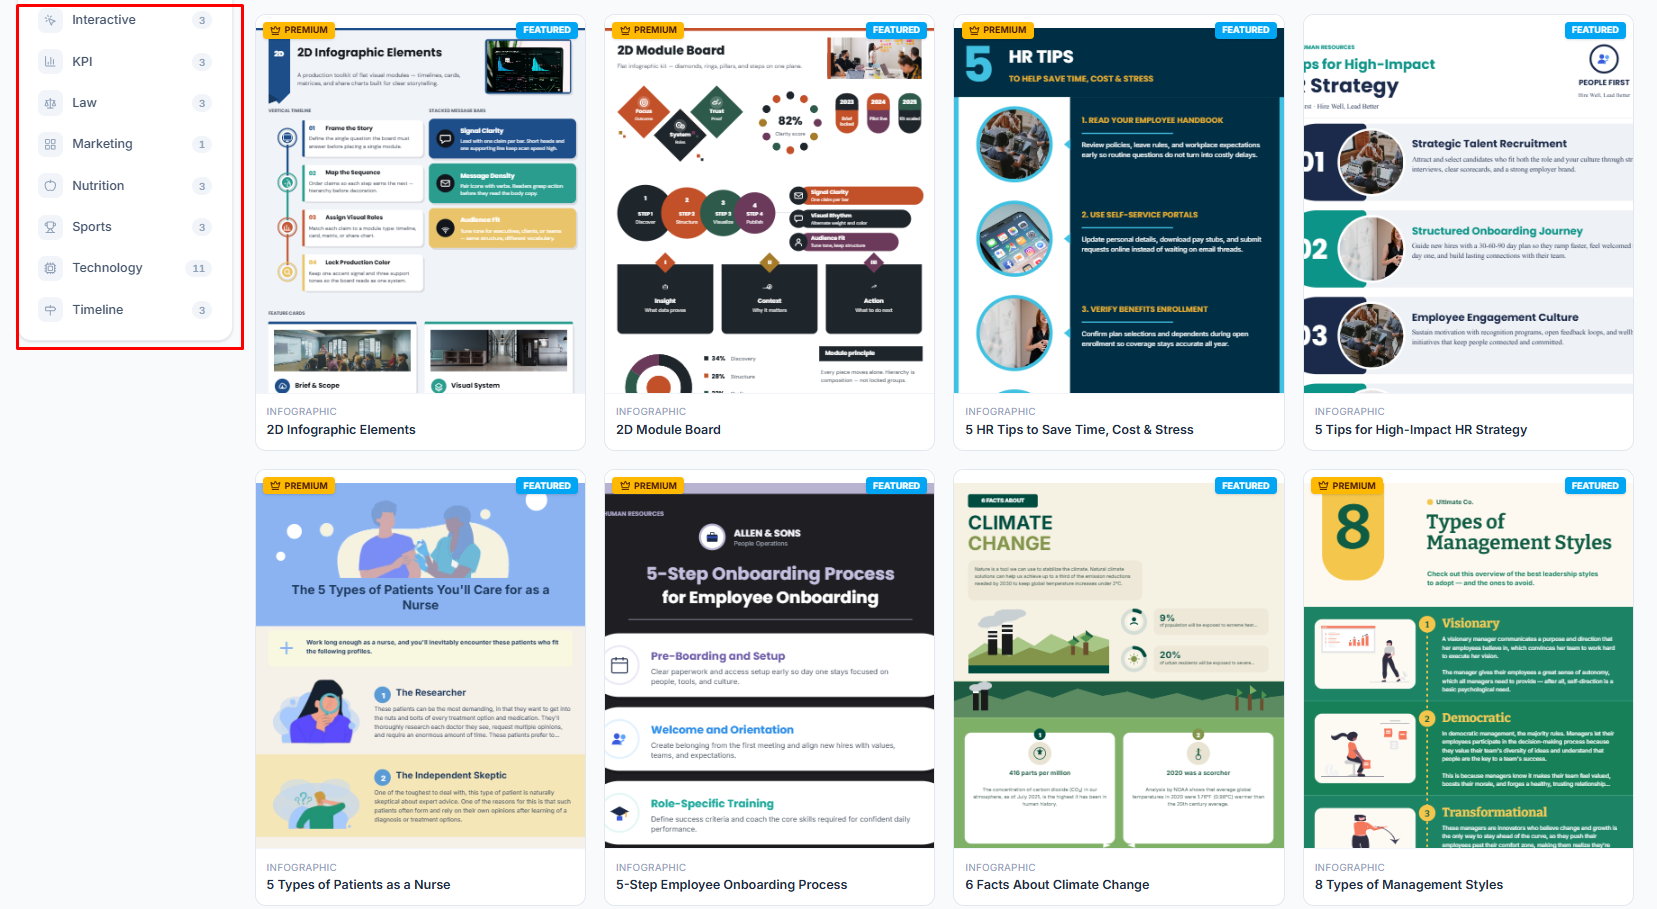
The left-hand panel breaks the full library down into topic-based categories so that you can browse rather than search.
Each category shows a count next to its name, so you can see at a glance how many templates are available in that topic before you click in. This is especially useful if you're working on recurring content types — for example, HR teams may find everything they need under Human Resources or KPI, while marketers may spend most of their time in Business or Marketing.
B Start from Blank
If none of the existing layouts fit your project, click the + Start from blank tile at the top-left of the template grid. This opens an empty canvas where you can design your own layout freely, without inheriting any preset structure, colors, or elements.
P Preview and Select
Clicking any template thumbnail opens a full preview. From there you can immediately begin editing — replacing placeholder text, swapping images, and adjusting colors — while the underlying layout and design system stay intact.
Template Labels
As you browse, you'll notice two labels on certain templates:
- Premium — marked with a badge in the top-left corner of the thumbnail, these templates are part of paid subscription tiers.
- Featured — flagged on templates that are especially popular or newly added, helping you spot trending designs quickly.
Tips for Using All Templates
Pro Tips:
- If you're not sure which category fits your topic, start with a keyword search — it searches across all categories at once.
- Hovering over a thumbnail often reveals a quick preview before you commit to opening it.
- Templates preserve their layout and style even after you swap in your own content, so you don't need any design experience to produce a polished result.
- If you use the same type of template repeatedly (e.g., weekly reports or recurring social posts), save it to your Template Folder after editing so you can find it again instantly.
Template Folder
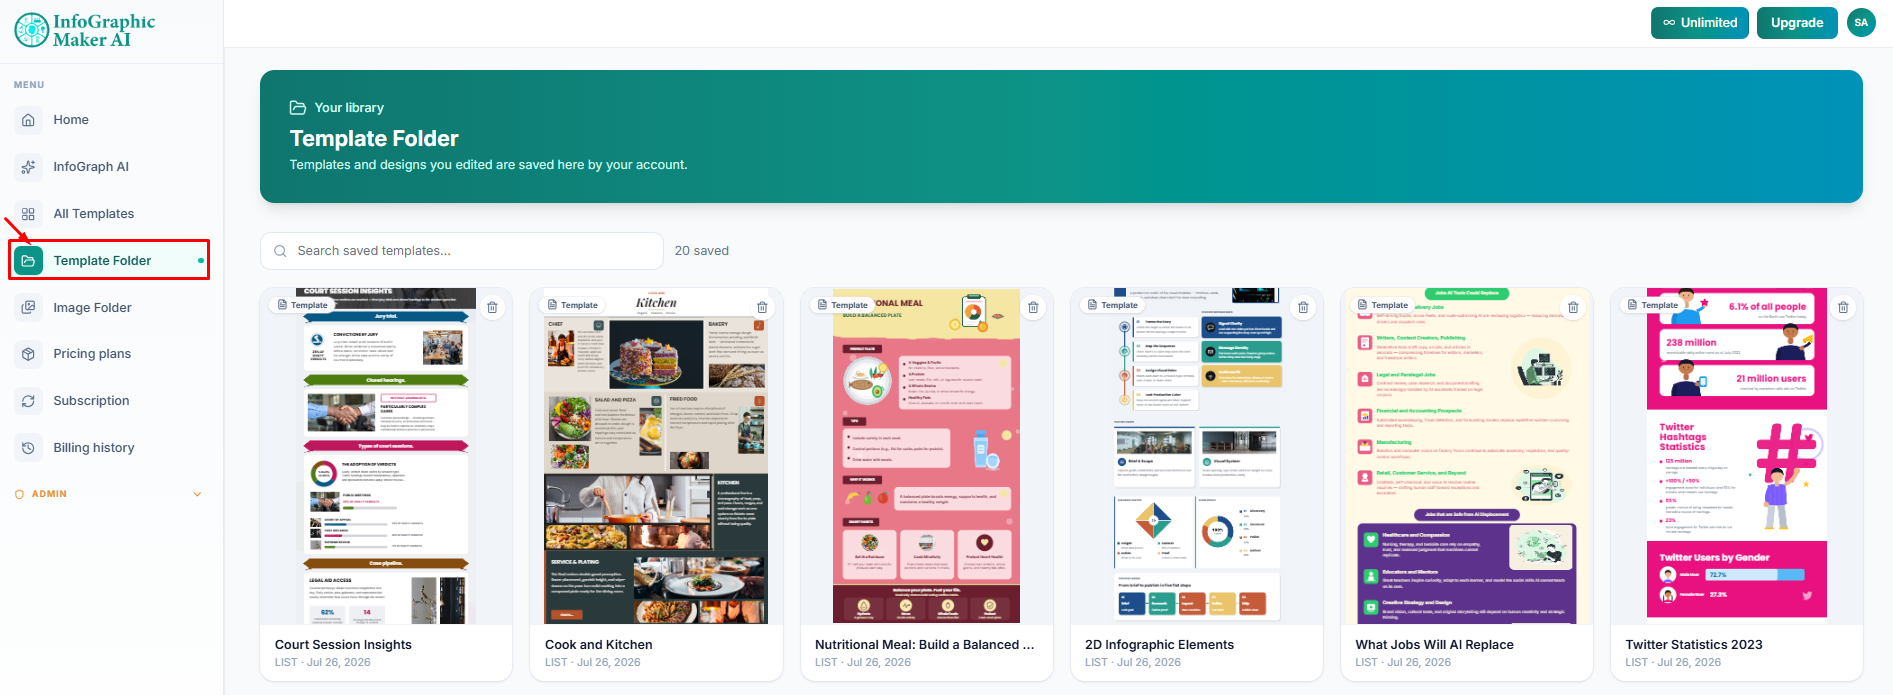
The Template Folder tab is your personal, private library of saved work. Every template or design you've opened, edited, and saved is stored here automatically, giving you a single place to pick up where you left off — without having to search back through the full All Templates gallery or recreate a design from scratch.
What You'll Find Here
Each saved item in your Template Folder displays:
Thumbnail Preview
A visual snapshot of the design as you last left it, so you can identify it at a glance.
Layout Type
The layout category the design belongs to (e.g., List, Process, Comparison, Timeline, 2D).
Last Edited Date
The date the design was last saved or modified, helping you find your most recent work quickly.
Finding a Saved Design
Use the search bar at the top of the Template Folder to look up a saved item by name. This is especially helpful once your folder starts to fill up with multiple projects — rather than scrolling through every thumbnail, you can jump straight to the design you need by typing a keyword from its title.
When to Use the Template Folder
The Template Folder is designed for ongoing and repeat work. Use it when you want to:
- Resume an in-progress design — pick up exactly where you left off instead of starting over.
- Reuse a past layout — duplicate the structure and style of a previous project for a new topic, saving you the time of rebuilding formatting from scratch.
- Maintain brand or style consistency — if you've customized a template's colors, fonts, or layout to match your brand, keeping it in your folder means every future project starts from that same foundation.
- Track your project history — the last-edited date makes it easy to see what you worked on recently and revisit older projects when needed.
Privacy: Because every saved template lives privately in your account, only you can see and access the designs stored in your Template Folder.
Image Folder
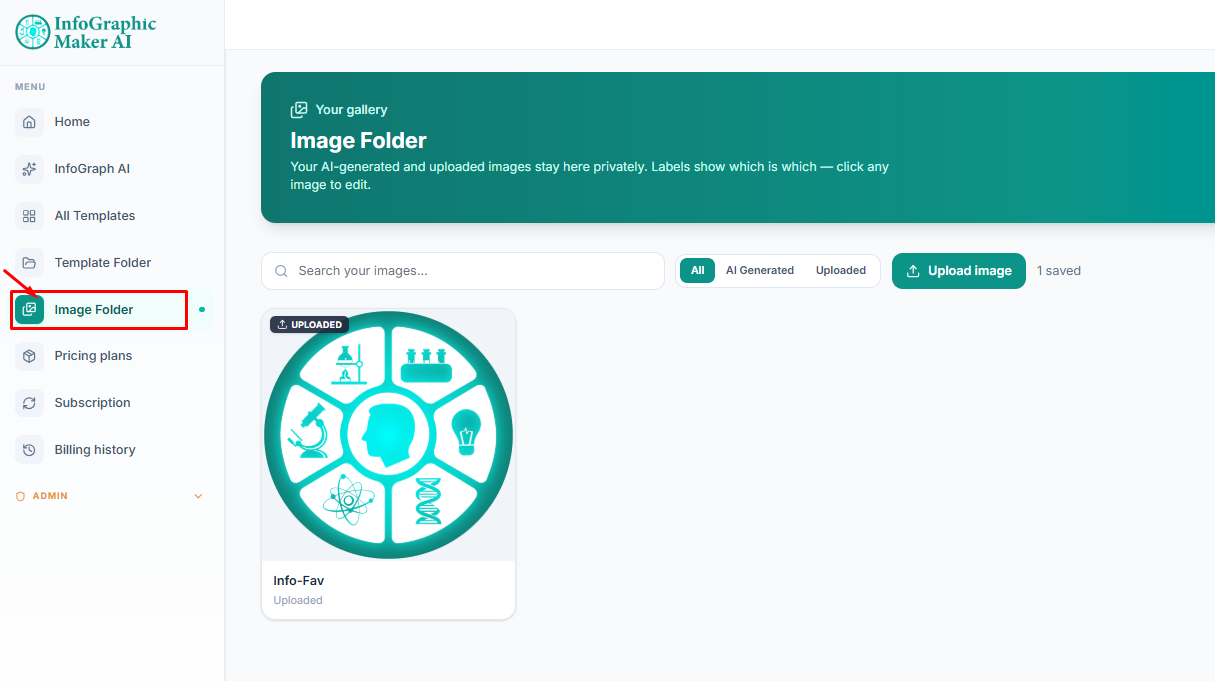
The Image Folder tab is your private gallery for every image connected to your account — whether it was generated by the AI tools or uploaded manually. It keeps all your visual assets organized in one place so you can reuse them across projects without regenerating or re-uploading the same content twice.
What You Can Do in the Image Folder
S Search
Use the search bar to locate a specific image by keyword. This is useful once your gallery grows to include many AI creations and uploads, letting you find the right asset without scrolling through the entire folder.
F Filter
Use the filter toggles at the top of the gallery to narrow down what you're viewing:
- All — shows every image in your gallery, both generated and uploaded.
- AI Generated — shows only images created using the AI tools (Image Generator, Icon Generator, Logo Generator, and others).
- Uploaded — shows only images you've manually added to your account.
U Upload Image
Click the Upload Image button to add your own photos, logos, icons, or graphics to your gallery. Once uploaded, these images are available to use anywhere in the platform, just like AI-generated assets — for example, as part of an infographic, template, or standalone project.
E Edit
Click on any image thumbnail to open it in the editor. From there, you can make adjustments directly, such as resizing, cropping, or applying further AI-powered edits (like background removal or upscaling, depending on the tool used).
Staying Organized
Every image in the folder is automatically labeled as either AI-generated or uploaded, so you always know the source of an asset at a glance — no need to guess whether an image was created in-platform or brought in from elsewhere. The gallery also displays a running count of saved images (e.g., "1 saved"), giving you a quick sense of how much content you've stored.
Why the Image Folder Matters
Because all your images are stored privately and centrally, the Image Folder saves you from regenerating the same visual twice or hunting down a file you uploaded weeks ago. It's the natural home for:
- Logos and brand assets you reuse across multiple projects.
- AI-generated icons or illustrations you want to drop into future infographics.
- Photos or graphics you've sourced elsewhere and want available inside the platform.
Stock Photos & Background Removal
Some of the visual tools inside Infographic Maker AI are powered by trusted third-party services, giving you professional-quality photos and clean image cutouts without leaving the platform.
Stock Photo Search — Pexels & Openverse
When you search for a photo inside the Image Tool or Image Folder, results are pulled from two sources:
Pexels
A high-quality stock photography platform with a large collection of professional, high-resolution images across many categories.
Openverse
A powerful image discovery engine that brings together visual content from a wide range of sources across the web.
Together, Pexels and Openverse make it easier to find relevant, high-quality visuals for infographics, presentations, marketing content, and creative projects. Image information and available source details are preserved so you can easily review the original content whenever needed.
Background Removal — remove.bg
R Remove Background
The background removal option available on uploaded and AI-generated images is powered by remove.bg, a dedicated AI background-removal service.
Selecting Remove Background on any image in your Image Folder sends that image to remove.bg's API and returns a clean, transparent cutout — ready to drop straight into an infographic or template.
Tip: Use the background removal feature to create professional-looking product shots or to isolate subjects for use in infographics, social media posts, or marketing materials.
Final Notes
Thank you for taking the time to explore this documentation. Infographic Maker AI is designed to make professional visual content accessible to everyone, whether you're generating a single AI image, building a full infographic from scratch, or working from one of our 134+ ready-made templates. Here are a few closing notes to help you get the most out of the platform.
A Quick Recap of Your Workflow
- Sign up and verify your email to activate your account.
- Check your Home dashboard to see your projects, credits, and recent activity at a glance.
- Use InfoGraph AI to generate images or infographics directly from a text prompt.
- Browse All Templates when you'd rather start from a ready-made design than a blank page.
- Return to your Template Folder to pick up saved or in-progress work.
- Manage your visuals in the Image Folder so every AI-generated or uploaded asset is easy to find and reuse.
Making the Most of Your Credits
Every AI action — generating an image, an infographic, or template variants — draws from your credit balance, which you can monitor at any time from the Home tab under Credit Usage. A few tips to use credits efficiently:
- Use Additional Instructions when generating infographics to get closer to your desired result on the first try, reducing the need for repeated generations.
- Start from a Suggested Template when possible — applying your content to an existing layout is often faster and more predictable than generating a new design from scratch.
- Keep an eye on your Remaining credits before starting a large batch of generations, and visit View pricing plans if you need to top up or upgrade.
Keeping Your Workspace Organized
As your account grows, a little organization goes a long way:
- Save frequently reused designs to your Template Folder rather than recreating them each time.
- Label your intent clearly in prompts and topics so future edits are easier to pick back up.
- Use the Search and Filter tools in the Image Folder and All Templates tabs rather than scrolling — they'll save you time as your library expands.
Troubleshooting Tips
Common Issues & Solutions:
- Didn't receive your verification email? Check your Spam or Junk folder first. If it's still missing, you can request a new verification email from the sign-in page.
- Generation taking longer than expected or producing unexpected results? Try refining your prompt with more specific details, or toggle Auto Enhance Prompt on to let the AI improve your wording automatically.
- Can't find a saved design? Use the search bar in the Template Folder — items are indexed by name, so a keyword from the title will usually surface it quickly.
- Running low on credits? Visit Pricing Plans from the Home tab to review upgrade options.
Need Further Assistance?
If you run into an issue that isn't covered in this documentation, our support team is here to help. You can contact us directly at help@infographicmakerai.com, and we'll be happy to assist you with any questions or technical concerns. We're continually updating this guide as new features roll out, so check back periodically for the latest tips and workflow updates.
Thanks for using Infographic Maker AI — we're excited to see what you create.
Start Creating AI-Powered Visuals Today
Join thousands of teams transforming their ideas into stunning visuals. No credit card required.